
The Ultimate Guide to Ironing Fuse Beads with Perfection
Are you ready to dive into the colorful world of fuse beads? In this comprehensive guide, we will walk you through everything you need to know about ironing fuse beads. Whether you are a beginner or an experienced crafter, these tips and techniques will help you create stunning works of art. So, let's get started!
1. Gathering Your Materials
Before you begin ironing fuse beads, it's essential to have all the necessary materials at hand. Here's a checklist to ensure you have everything you need:
- Fuse beads in various colors
- Pegboards in different shapes and sizes
- Ironing paper or parchment paper
- An iron
- A flat and heat-resistant surface
- Tweezers (optional, but helpful)
Once you have gathered all these materials, you're ready to embark on your fuse bead ironing adventure!
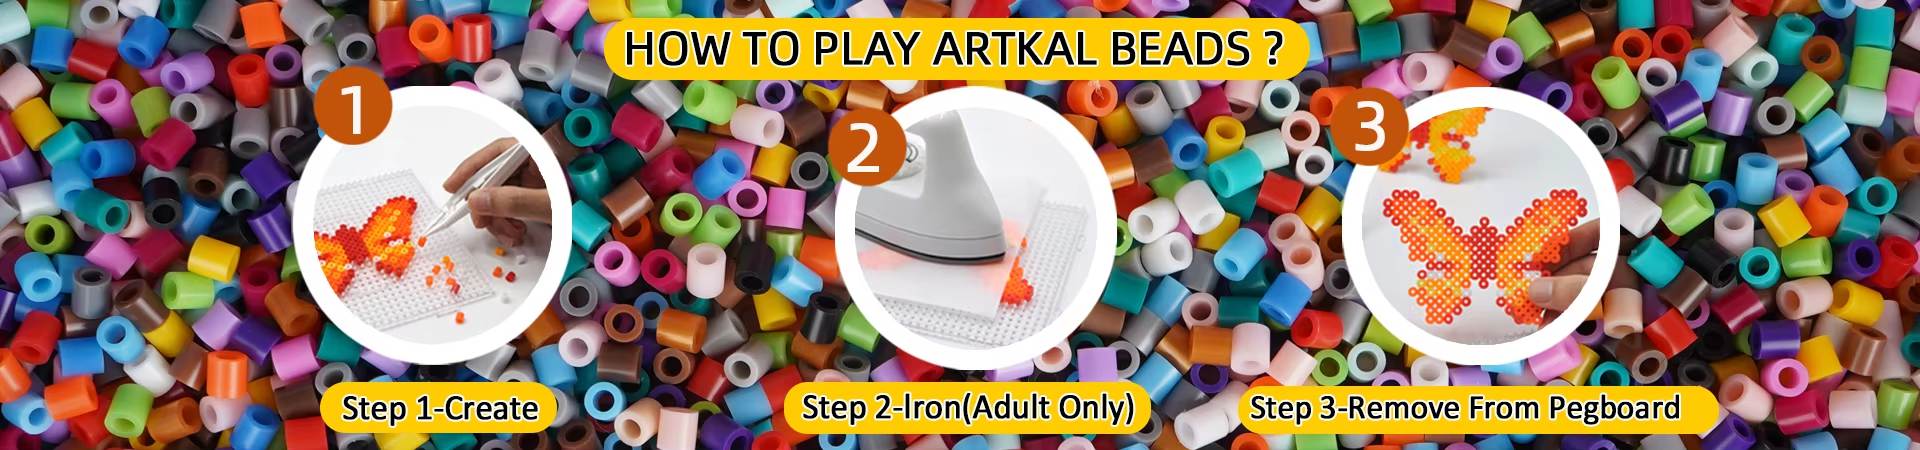
2. Creating Your Design
The next step is to choose or create a design using the fuse beads. You can find pre-designed patterns online or create your own using a pegboard. Experiment with different bead color combinations to bring your imagination to life. Place the beads on the pegboard according to your design, and make sure to leave some space between them for ironing purposes.

3. Applying the Heat
Now comes the exciting part—ironing the fuse beads! Cover your design with the ironing paper or parchment paper to protect both the beads and the iron. Set your iron to a medium heat setting or follow the instructions provided with your specific fuse bead brand. Gently press the iron over the paper-covered beads in a circular motion, ensuring even heat distribution. Be patient and avoid rushing, as proper heat application is crucial for a successful outcome.
4. Achieving the Perfect Melt
As you iron, keep a close eye on the beads. The heat will gradually melt them, fusing them together to form a solid piece. Avoid applying too much pressure or overheating, as this can cause the beads to warp or lose their shape. Once you see that the beads have melted and fused together, remove the iron and let the design cool for a few minutes.
5. Finishing Touches and Display
After your fused bead creation has cooled, carefully peel off the ironing paper. If you notice any areas where the beads haven't fully fused, cover them with the paper again and reapply the iron. Once you are satisfied with the final result, you can display your masterpiece in various ways. Frame it, attach a magnet to the back, or string it onto a keychain—the possibilities are endless!
Let Your Creativity Shine!
Now that you've mastered the art of ironing fuse beads, you can let your creativity run wild. Create intricate designs, experiment with different techniques, and challenge yourself to push the boundaries of what's possible with fuse beads. Remember, practice makes perfect, so don't be afraid to try new patterns and unleash your imagination. Happy beading!
Summary:
Ironing fuse beads is a fascinating and creative craft that allows you to transform tiny beads into beautiful works of art. By following the steps outlined in this guide, you'll gain the skills and knowledge to create stunning designs with precision. Remember to gather all the necessary materials, carefully apply heat, and enjoy the process. With practice, your fuse bead creations will become unique masterpieces that showcase your artistic talent.